linux cloud backup setup
Requirement is to go from my almost non-existent/ manual backup "strategy" to something simple and robust that makes use of cloud storage I already have. I have very few local files that I couldn't do without or couldn't recreate but I realise it would make life easier if I had a few constant folders across my computers that were also occasionally backed up off-site.
Rough plan is below:
core network emulator
CORE is a very handy network emulation tool with plenty of options to let you test out your networking plan. Currently using it to plan out a small network build with some specific zone separation in place and though I'd bookmark it here.
setup wireguard vpn
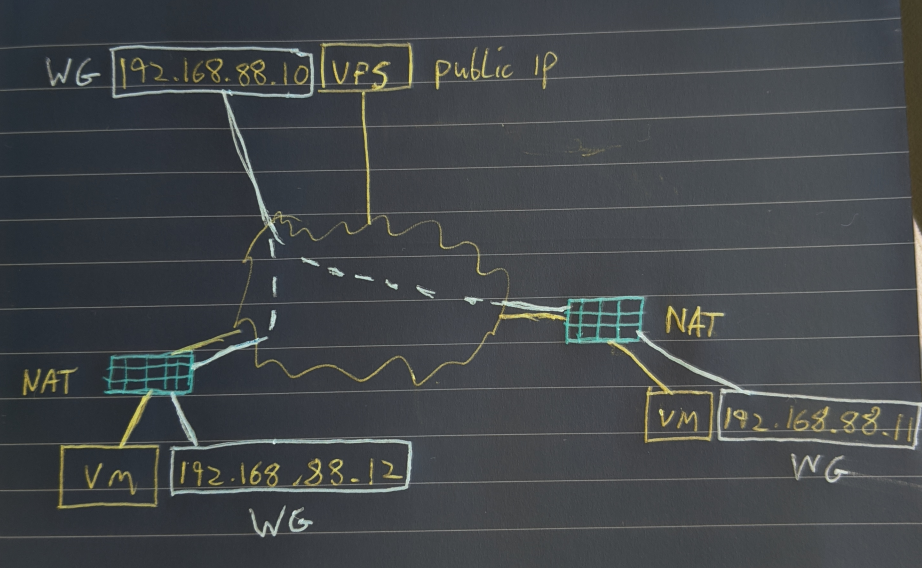
WireGuard is a fast, easy to configure VPN. If you have at least one node with a public IP all devices will be able to communicate with each other regardless of NAT or port forwards. The setup below has three nodes, one VPS node with a public IP and two additional nodes, both behind NAT.

Stage 1: Install WireGuard on our clients.
I'm not going to re-produce the install procedure, WireGuard have very good documentation available here. I installed on three systems, two Ubuntu 19.10 Servers and one CentOS 8.
- ubnt-01 (Local VM)
- ubnt-02 (VPS with WAN IP)
- cent-01 (Local VM)
Once installed you can run sudo wg to check if it's installed, you will get an error if it's not.
silently deploy fonts with pdqdeploy
Below is a quick and easy method of deploying fonts from a central location using PDQ Deploy and a utility called FontReg
secure ssh access using keys
In order to secure SSH access to a newly deployed Linux server it is highly recommended you disable password based SSH logins and instead force key based logins as it practically eliminates the possibility of a brute force login attack being successful. There are a few steps to setting this up which I go through below.
Stage 1: Account Setup
We're assuming the only account on first boot is root so first thing we need to do is create a new user for remote access and give it sudo privileges.
useradd -m srvadmin
passwd srvadmin
usermod -a -G sudo srvadmin

extend volume to new physical disk with lvm
The initial OS was installed using LVM so extending it is relativly straight forward. The steps below describe the process, here the Ubuntu server / was running low on space. I added a new disk and extended the existing volume to use the new disk increasing the free space on root /

Example image above shows an initial storage configuration on the left. The right shows additional storage added later and used to extend existing volume.
filemaker server failover procedure
The procedures below allows a switch over form standby to live server or vice versa in either a graceful or forced fashion. All related files and scripts are available on GitHub here including some notes on the initial Filemaker Server setup.
Graceful switchover from the primary to the standby FMS.
You can only run this scenario when both the primary and standby servers are available on the network. (In the event your primary server is no longer available (e.g. hardware failure) and will not be back online please run the failover procedure document after this one.)
reset windows administrator password
In the event you forget/ lose/ neglect to write down the administrator password on a Windows machine (this is confirmed working on Server 2012 but should work on most versions) below are the steps required to reset the password.
Reset the Password:
adding disk target to existing windows backup
If you need to add a new external disk to an already configured Windows Backup rotation, run the following commands from an elevated command prompt after connecting the new disk.
wbadmin get disks
WBADMIN ENABLE BACKUP -addtarget:{xxxxxxxx-xxxx-xxxx-xxxx-xxxxxxxxxxxx}
Use the results from the first command to ID you new disk(s) and enter the respective disk ID into the second command to add it to the rotation.
make a bootable usb key windows installer
From an elevated cmd prompt type the following commands:
- diskpart
- list disk
- select disk # (number of usb key)
- clean
- create partition primary
- select partition 1
- active
- format fs=ntfs quick
- assign
Now copy contents of the Windows iso or dvd to the key.